Monday, 31 December 2012

Add Fixed 3D Social Buttons With Hover Effect to your Blog

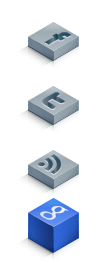
Today i tell you how to add cool Fixed 3D social buttons with mouse hover effect.These buttons float on right side of your blog and when you move your mouse over then they turn info colorful 3D button.And the main feature of this widget is that they move with you when you scroll down.This widget surely increase your blog traffic, Social sharing likes and your blog reader.Then why are you waiting get this widget now !!


Add This Widget To Your Blog


1-Goto Blogger Dashboard > Layout > Add Widget.
2-Select HTML/Javascript widget.
3-Now paste the below code in it,


<!-- rnhckr.com 3D Social Widget Code -->
<style> .TNT-flt-wdt { position:fixed; right:10px; top:36% ; } .TNT-flt-wdt img { float:right; clear:right; margin:1px; -webkit-transition: all .0s ease-in-out; -moz-transition: all .2s ease-in-out; -o-transition: all .2s ease-in-out; transition: all .2s ease-in-out; } .TNT-flt-wdt img:hover { -moz-transform: scaleundefined1.2) rotateundefined6deg); -webkit-transform: scaleundefined1.2) rotateundefined6deg); -o-transform: scaleundefined1.2) rotateundefined6deg); -ms-transform: scaleundefined1.2) rotateundefined6deg); transform: scaleundefined1.2) rotateundefined6deg); } </style> <div class="TNT-flt-wdt">
<style> .TNT1 { display: block; width: 64px; height: 64px; background: urlundefined'https://blogger.googleusercontent.com/img/b/R29vZ2xl/AVvXsEhAkAKEs_bZTd-hgFXRBvFNu5_IWm9qv6S4FX3tizMV6S88Z9MnjC70Mrjf8OTKtvJSBvxPMl3k0gs17F4PtUb7I6iTm2l2h0Td7G8EREVCpJfC0439Dqg0BFT8cwgmLYKgTZ8A0uILWdm2/s1600/Facebook+Icon.png') bottom; text-indent: -99999px; } .TNT1:hover { background: urlundefined'https://blogger.googleusercontent.com/img/b/R29vZ2xl/AVvXsEh_Wx0t2cQQiRpD5zcwJUy-zcFHbOHybKDCZ5pHi7nPvqtPKtTtSVI4Pmr4zLmTT4Q-cdwraPXdnZFtXfQRvxIjDtgZrE41ydodrXxZihhsF4me2ylCX9XgZMEVfxGt802TOo3VWRu9PZkZ/s1600/Facebook+Rollout+Image.png') bottom; height: 64px; } </style> <a class="TNT1" href="YOUR FACEBOOK LINK HERE"></a>

<style> .TNT2 { display: block; width: 64px; height: 64px; background: urlundefined'https://blogger.googleusercontent.com/img/b/R29vZ2xl/AVvXsEjZpk9YNyjAlGUUaSgRhMCgTBPpD_-3OEjXm5Bzj6RDGoKluVZUXrJVfV4SrLtu4NqeIsZ9cVOh4k6c19BY6gYG37ezWcld_V5T6nkZuHmajawJTcFufjtrBgknOojHLaHduBxuFsX_Q08R/s1600/Twitter+Icon.png') bottom; text-indent: -99999px; } .TNT2:hover { background: urlundefined'https://blogger.googleusercontent.com/img/b/R29vZ2xl/AVvXsEjXPpg_FO_O4qSVXiuXW7Xzup82wEYzF3g4uF7AtdPHJ4HAXFTEN8iAd0E4EHbhre1fGDRNZAx_l9KMzUED6xLdNm5kjYQKtAuNmM2HDKrUG8Ck6Kr3DuVprma5osH9oY1lu2yllUhFCfbB/s1600/Twitter+Rollout+Image.png') bottom; height: 64px; } </style> <a class="TNT2" href="YOUR TWITTER LINK HERE"></a>

<style> .TNT3 { display: block; width: 64px; height: 64px; background: urlundefined'https://blogger.googleusercontent.com/img/b/R29vZ2xl/AVvXsEhZBn30VC41fZwt6NOvltQuAwTNF3qOB97Z2fcmTVj-WMHk1b0tZn7ks8Ur_txvOqFf-Q8ZbGPNEIvlvZB-ik42VYfXgYkylfdcPA6fT6DZWIs9o-zKC4L1mDYovSFlG8h9_c1Mlty8D0mA/s1600/Feedburner+Icon.png') bottom; text-indent: -99999px; } .TNT3:hover { background: urlundefined'https://blogger.googleusercontent.com/img/b/R29vZ2xl/AVvXsEggf3LEsv_zUPnjGVlLpdRItLAAvFZpXZoSjS3b2e-uIL5PkOS5B8nDXduWpa1c7syKFrojBUXZqi92TTAOn853iI7bAhlanUrvusxYIHhMf594HtZe_9hNe81Sbk3uASABNinUCsQICDmm/s1600/Feedburner+Rollout+Image.png') bottom; height: 64px; } </style> <a class="TNT3" href="YOUR RSS FEED LINK HERE"></a>

<style> .TNT4 { display: block; width: 64px; height: 64px; background: urlundefined'https://blogger.googleusercontent.com/img/b/R29vZ2xl/AVvXsEg_scoR1m_cweHnegql14IHKwkE7AeSyWQqODmkoCyD1siZSEM7V9spQVywx_XS0zwS3slJE6tJI5PT_3L6ChjEhBqhcL3KQvzki7fqY3FrsZrwLI_gokZ5S2BUdIyD-f-du9tdSkFEIfuL/s1600/Google+Icon.png') bottom; text-indent: -99999px; } .TNT4:hover { background: urlundefined'https://blogger.googleusercontent.com/img/b/R29vZ2xl/AVvXsEhLn3zK7OOFYHVd96U5SEGr8P4JxDw2ziHWntGjp9gmaTMtMEffpvgVyPi8wMS2xbyMeAwZzCPQatwWWuBA99aoLN0A0NCk9s6TjbnE_k6IgVTWgMHcORKb3sOBiT0CUbdNVVJfPsEi3AyY/s1600/Google+Rollout+Image.png') bottom; height: 64px; } </style> <a class="TNT4" href="YOUR GOOGLE PLUS LINK HERE"></a>
</div>
<!-- rnhckr.com 3D Social Widget Code -->

4- Replace YOUR FACEBOOK LINK HERE with you facebook fan page url.

5- Replace YOUR TWITTER LINK HERE with your twitter page url.


6-. Replace YOUR RSS FEED LINK HERE with your rss feed url.
7- Replace YOUR GOOGLE PLUS LINK HERE with your google+ profile url.
8-Save It...that's all
Hope you all Like This post ...so make your valuable comment if you like this post.


Sunday, 30 December 2012

Live HTML Editor

Live HTML Editor: The results of HTML typed in the top frame immediately appear in the bottom frame.


Download Live HTML Editor Here!
Don't Forgot to Share with Your Friends


Saturday, 29 December 2012

Customize Your Blog/Site Search Using Google Custom Search Engine

When we do a comparison between Google and other search engine, clearly Google possess the upper hand by a fare long margin. Google is the most dependable and admirable search engine ever born till date thus, it is more commonly known as the search engine giant. The biggest reason behind its success is frequent development in its searching abilities.  If you have observed those blogger templates which has custom searching gadgets, then you may have observed that they are incapable of displaying relevant results. Those searching gadgets possess limited functionality due to which, they are not capable to search the whole blog (each and every word) they work on the basis of post titles. The Best solution is to use Google Search Engine (GSE) which digs the most relevant data from your Blog and displays it to your visitors.

This will decrease your Bounce Rate because your visitors will get most desirable results according to their needs. Furthermore, you can even integrate your AdSense account to your Google Custom Search which will display relevant advertisement related to the searched term. The preview of this widget can be viewed at the top of the sidebar in this rnhckr.com.  So without any further delay let’s create and install Attractive Google Search Boxes for your Blog.


How To Create Your Own Google Custom Search Engine:

The steps are extremely uncomplicated and this would not take more than 30 minutes for the complete customization and integration.
  1. Go To Google Custom Search(GSE)
  2. Now select “New search engine...” on the left side of your screen.
  3. Then a form will be opened, just fill it according to your personal information.

 4. After filling the form correctly Press the “Next” button and now you will customize (style) your search engine. You can either select the pre-existing style or can modify them by pressing “Customize” button. 
 5. After customizing the Search engine according to your needs, go ahead and hit “Next” button.
 6. Now you will able to see a chunk of coding, just ignore it and Press the link which says “look and feel” and proceed to next step.

 7. It will take to you to the page where you will able to see different options through which you can place your Google Custom Widget to your blog.
  • Full-Width: If you choose this method then it will show search results within the page.
  • Compact: If you want to see your search results in the Sidebar then choose this.
  • Two Column:  If you want to see your Search widget in the sidebar and the search result in post body then select this.
  • Two Page: If you want to place your Search gadget in the sidebar but would like to see search results in another page then select it.
  • Results Only: This will display the search results on the same page.
  • Google-Hosted: This will display your blog’s search result in a separate widow hosted by Google.
We would recommend that you should use the “Two Page” method because it will take your visitors to the new page and will increase your page views while decrease your bounce rate. Finally Press the button “Save and Get Code”.

Integrating Google Custom Search To Blogger Blogspot Blog:

  • Now Select “Two Page” from the GSE Layout MENU and finally Press the button “Save and Get Code”.
  • Now go to Blogger >> Add a Page >> and name the title of the page as SEARCH Engine and publish the blank page. Remember: Don’t forget to disable the commenting on that page.
  • Copy the first code from Google Custom Search (GCS) and paste it in your sidebar i.e. Layout >> Add a Gadget >> Html/JavaScript >> Paste the code here.
  • Now copy the Second code from Google Custom Search and paste it in the Page which your created previously, don’t forget to publish it again.
  • That’s it now go and test your Custom Google Search Engine I bet this widget will never let you down.

Conclusions:

The only thing which could annoy your users is the unwanted Advertisements by Google which you will see during the search results, but if you don’t want Google ads to interfere your Users then try to buy a developer license worth $100/year From Google. However, I must say this service is truly splendid you must give it a try till then peace, blessings and happy searching.

Friday, 28 December 2012

CSS3 Online Free Button Generator


CSS3 Button Generator lets you visually style an ordinary HTML link into a sleek button using all the new goodies of CSS3. This includes gradient backgrounds, rounded corners, drop shadows, and even tranforms. Throw in support for CSS3 animations that lets you gradually change from the button's default state to its hover state, and you got one sexy looking button without the overhead of images!

Dont Forgot to Share Your Friends


Thursday, 27 December 2012

How to add Multi-Colored Popular Posts Widget to Blogger?


This tutorial will show you How to Add Different/Multi Colored Popular Post Widget In blogger. This widget is the main part of this hack is you don't need to add any heavy JavaScript or any other scripts we will apply this hack with using only CSS. Also you can customize this widget with using blogger template designer. Let’s go to the tutorial.

How to add Multi-Colored Popular Posts Widget  to Blogger?

  • Go to Blogger Dashboard --> Template --> Edit HTML --> Proceed
  • Backup your Template before making any changes to your blog
  • Now Expand Widget Templates
  • Press Ctrl + F and search the code shown below

]]></b:skin><

 Now Paste the Code Shown Below just above/before it

/* top post Widget start by rnhckr.com */
#PopularPosts1 ul li a:hover{color:#fff;text-decoration:none}
#PopularPosts1 ul li a {-webkit-text-size-adjust: auto; -webkit-text-stroke-width: 0px; color: #333333; display: block; font-family: Georgia, 'Times New Roman', Times, serif; font-size: 13px; font-style: normal; font-variant: normal; font-weight: normal; letter-spacing: normal; line-height: 18px; margin: 0px 40px 0px 0px; min-height: 30px; orphans: 2; padding: 0px; text-align: -webkit-auto; text-decoration: none !important; text-indent: 0px; text-transform: none; white-space: normal; widows: 2; word-spacing: 0px;}
#PopularPosts1 ul li .item-thumbnail{float:left;border:0;margin-right:10px;background:transparent;padding:0;width:51px;height:51px}
#PopularPosts1 ul li:first-child:after,
#PopularPosts1 ul li:first-child + li:after,
#PopularPosts1 ul li:first-child + li + li:after,
#PopularPosts1 ul li:first-child + li + li + li:after,
#PopularPosts1 ul li:first-child + li + li + li + li:after,
#PopularPosts1 ul li:first-child + li + li + li + li + li:after,
#PopularPosts1 ul li:first-child + li + li + li + li + li + li:after,
#PopularPosts1 ul li:first-child + li + li + li + li + li + li + li:after,
#PopularPosts1 ul li:first-child + li + li + li + li + li + li + li + li:after,
#PopularPosts1 ul li:first-child + li + li + li + li + li + li + li + li + li:after{position:absolute;top:10px;right:5px;border-radius:50%;border:2px solid #ccc;background:#353535;-webkit-box-shadow:0px 0px 5px #000;-moz-box-shadow: 0px 0px 5px #000;width:30px;height:30px;line-height:1em;text-align:center;font-size:28px;color:#fff}
#PopularPosts1 ul li:first-child + li + li + li + li + li + li + li {background:#DF01D7;width:90%}
#PopularPosts1 ul li:first-child + li + li + li + li + li + li + li:after{content:"8"}
#PopularPosts1 ul li:first-child + li + li + li + li + li + li + li +li{background:#B041FF;width:90%}
#PopularPosts1 ul li:first-child + li + li + li + li + li + li + li + li:after{content:"9"}
#PopularPosts1 ul li:first-child + li + li + li + li + li + li + li +li +li{background:#F52887;width:90%}
#PopularPosts1 ul li:first-child + li + li + li + li + li + li + li + li + li:after{content:"10"}
#PopularPosts1 ul li:first-child + li + li + li + li +li{background:#7ee3c7;width:90%}
#PopularPosts1 ul li:first-child + li + li + li + li + li:after{content:"6"}
#PopularPosts1 ul li:first-child + li + li + li + li + li +li{background:#f6993d;width:90%}
#PopularPosts1 ul li:first-child + li + li + li + li + li + li:after{content:"7"}
#PopularPosts1 ul li:first-child + li + li + li + li{background:#33c9f7;width:90%}
#PopularPosts1 ul li:first-child + li + li + li + li:after{content:"5"}
#PopularPosts1 ul li:first-child + li + li + li{background:#c7f25f;width:90%}
#PopularPosts1 ul li:first-child + li + li + li:after{content:"4"}
#PopularPosts1 ul li:first-child + li + li{background:#ffde4c;width:90%}
#PopularPosts1 ul li:first-child + li + li:after{content:"3"}
#PopularPosts1 ul li:first-child + li{background:#ff764c; width:90%}
#PopularPosts1 ul li:first-child + li:after{content:"2"}
#PopularPosts1 ul li:first-child{background:#ff4c54 ;width:90%}
#PopularPosts1 ul li:first-child:after{content:"1"}
#PopularPosts1 ul{margin:0;padding:0px 0;list-style-type:none}
#PopularPosts1 ul li{position:relative;margin:6px 0;border-radius:25px 0px 25px 0px;border:2px solid #f7f7f7;-webkit-box-shadow:3px 3px 3px #000;-moz-box-shadow: 3px 3px 3px #000;padding:10px}
/* top post Widget end by rnhckr.com */

Now save your template
  •  Now Go to Blogger Dashboard --> Layout --> Add a Gadget --> Popular Posts
  • Select "display up to 9 posts" and uncheck image thumbnail and snippet
  • Now Save the widget


Wednesday, 26 December 2012

Color Code Generator and Color Wheel


The two tools below will help you get the six digit color code i.e hexadecimal value. These tools will help you a lot in customizing your Blogger templates and for writing more appealing posts. You can use this code to edit the color of the template of your site and customize it with what ever color you want.

Kindly Follow the instructions for each tool before using it.


Color Code Generator

  • First drag the bar on the "Hue" selector to the area of your desired colour palate.
  • Then click inside the Brightness/Saturation area and drag the cursor until you have achieved your desired colour. The "Swatch" bar shows you the final colour result.
  • The hexadecimal colour code is generated in the "Hex" box. Simply copy the six digit code i.e #000000


Color Wheel For Choosing Matching Palate Colors

If you already have a Color HEX value with you:
  • Input the Hex value(Without "#") to the form below and hit "update". You will see the variations of all the related colors. You can use any one of them on your webpage or Blogger for designing.
If you don't have an HEX value:
  • Then click on the wheel/color of your choice and get some variations of that color.


Blogger Widget "Add to Blogger" button Code Generator


If you are a publisher of any Widget/Gadget for Blogger and you want to host it on your Blog/Site in such a way that the Users can add your widget to their blog on the click of a button. Then you can use this Generator to generate a Form which contains the code for creating such feature. You just have to paste the generated code in your Blog/Site wherever you want the "Add to Blogger" Button to render. After clicking the button user will be redirected to Blogger Add Element Page to add the Gadget.This Generator is very useful for the publishers who creates their own gadget for their users. See Live Demo


If you are facing any problem integrating the Add to Blogger button in you site then you can comment and ask about it.


CSS Web Color Chart: 216 Hexadecimal Values.


Below is an embeddable Web Colour Chart most probably known as hexadecimal colour chart. The chart below consists of a total 216 hexadecimal colours which are well interpreted by all browsers and are compatible in every sense.

These tools will help you a lot in customizing your Blogger templates and for writing more appealing posts. You can use this code to edit the color of the template of your site and customize it with what ever color you want.


Meta Tag Generator Tool

Meta elements provide information about a given Web page, most often to help search engines categorize them correctly. They are inserted into the HTML document, but are often not directly visible to a user visiting the site.

They have been the focus of a field of marketing research known as search engine optimization (SEO), where different methods are explored to provide a user's site with a higher ranking on search engines. In the mid to late 1990s, search engines were reliant on meta data to correctly classify a Web page and webmasters quickly learned the commercial significance of having the right meta element, as it frequently led to a high ranking in the search engines — and thus, high traffic to the website.

As search engine traffic achieved greater significance in online marketing plans, consultants were brought in who were well versed in how search engines perceive a website. These consultants used a variety of techniques (legitimate and otherwise) to improve ranking for their clients.

Meta Description

The description attribute provides a concise explanation of a Web page's content. This allows the Web page authors to give a more meaningful description for listings that might be displayed if the search engine was unable to automatically create its own description based on the page content.  Almost all search engines recommend it to be shorter than 155 characters of plain text. The Character Counter tool can help you.

Note: If Meta description appears for all pages in your blog then search engine robots would think that all your pages are having same description. Since robots deal each page as a separate website therefore your blog could get penalized for using same meta description over and over again. To avoid this two pieces of codes are added before and after meta description so that it may appear to robots at homepage only. Following are the two codes added to the tool by default:

<b:if cond='data:blog.url == data:blog.homepageUrl'> 
<META NAME="Description" CONTENT="Your Blog description"> 
</b:if>

Meta Keywords
They keywords tag is not usually displayed in search results and is a hidden input which page viewers can not see unless they use the view source function.
  • Not important: It is not used by most search engines since it is highly susceptible to spam and users never see it.
  • Should consist of a couple of the main keywords used to describe that page.
  • Former Yahoo! Search engineer Jon Glick stated that the meta keywords tag is used for inclusion within a subset of search results, and has no effect on relevancy.
  • Is only created for machines.

Meta Author
Meta Author is not a very important tag but still many bloggers likes to attach his name to his website/blog so why should you left behind!. Simply write your full name and avoid using nicknames or special symbols.
If you don't want to add your name then simply leave the blank empty in the tool.


Meta Robot
The robots attribute, supported by several major search engines, controls whether search engine spiders are allowed to index a page, or not, and whether they should follow links from a page, or not. The attribute can contain one or more comma-separate values. The noindex value prevents a page from being indexed, and nofollow prevents links from being crawled. Other values recognized by one or more search engines can influence how the engine indexes pages, and how those pages appear on the search results.
By default blogger tags all blogs as ALL
If you don't want to be bothered with this tag then simply leave the blank empty in the tool below.


Character Counter Tool


Character Counter ToolBoth Post titles and Meta Description plays an integral part in the eyes of search engines. It’s important that your Meta Description must not exceed 150 Characters including spaces and that your Post titles Must not exceed 66 Characters.

Google shows 66 characters of title of blog post.So keep Blog Title less than or equal to 66 characters.Similarly it 150 characters of meta description.

HTML Character count Tool is a popular tool to count characters that is used for SEO.You can count characters in the following Tool. Also Manual counting of characters in title with white spaces is, i think it is bit difficult So use this tool to count.


Run Android Apps in PCs with Windows/Mac Platform


The success of Android Operating System gradually depends upon the apps they are running. Android has really very cool and handy Apps which are daily used by millions of people. We can use Google Play to find out many interesting Android Applications. As the popularity of Smartphone’s and tablets increases, so the uses and dependencies is on the apps available for them. Whether the App is a hot game, a handy price checker, or a useful contact manager, the constraints of Smartphone and tablet designs and interfaces have forced app developers to find creative ways to present and access data. But unfortunately, most apps created for Smartphone’s or tablets aren't available for use on a PC.

But There is one solution! BlueStacks. This company had created an App Player with which you can run Android apps on Windows or Mac Platforms.

Introduction

Bluestacks is a Silicon Valley-based software company that produces BlueStacks App Player and BlueStacks Cloud Connect. Both products revolve around enabling Android applications to run on Macintosh computers, Windows PCs and Windows tablets. The company was founded in 2009 by Rosen Sharma, former CTO at McAfee and board member of Cloud.com. App Player which is a software or what we say an emulator for the Android Apps. The BlueStacks app player essentially runs an instance of Android in a virtualized environment on the PC, so the apps act as though they're running on a mobile device.

Steps To Use
  • To use the BlueStacks app player, you must first download the setup 


  • Run the setup and follow the procedure provided to install the Player.
  • After installation is complete, launch the App Player.


Synchronizing Apps between your PC and Android Mobile Device

Sync Android Apps from your phone or tablet to BlueStacks using Cloud Connect mobile app.


Your apps will be stored on your own personal Cloud Connect App Channel as seen in this video. Download it now from Google Play. Click the button to go to Cloud Connect App page


Tuesday, 25 December 2012

Cool Feedback Widget For Blogger Generator

Cool Feedback Widget For Blogger Generator

This widget will help you to know what your viewers think about your blog and it really gives a pro-look to your blog. 


Cool Feedback Widget For Blogger Generator

Alright here we go :
  • First go and create a Feedback form with the help of this post.
  • Now after creating form just put 'Form Embed Code' below :
  • Just add and if your form doesn't fit in screen size go to layout and edit this widget and change Width and Height of your Form Embed Code


Also Try: Simple Feedback Form Using JQuery And CSS For Blogger

Monday, 24 December 2012

Animated (On Hover) Fixed-Floating Twitter-Follow Me Badge

Get more twitter followers, by adding a Twitter Follow-Me/Us badge to your blog.
This tutorial will quickly explain you, how to add a fixed-floating twitter follow me badge to your blog's layout.


Steps to follow:
1. Log in to Blogger
2. Go to Layout -> Edit HTML, and find this code in the template:
</head>
3. Immediately ABOVE/BEFORE that code, paste these lines of code:

<!--FOLLOW-ME-STARTS-->
<style type='text/css'>
.feedbacktw {
width: 31px;
height: 136px;
display: block;
font-size: 10px;
text-decoration: none;
background-repeat:no-repeat;
background-image:url(http://i26.tinypic.com/1zb4509.jpg);
position:fixed;
top:35%;
left:2px;
}

.feedbacktw:hover {
width: 31px;
height: 136px;
display: block;
text-decoration: none;
background-repeat:no-repeat;
background-image:url(http://i26.tinypic.com/xpu99c.jpg);
position:fixed;
top:35%;
leftt:10px;
}
</style>
<!--FOLLOW-ME-STOPS-Widget-by-http://rnhckr.com-->
4. Finally in Layout -> Page Elements -> Add a Gadget (HTML/JavaScript type), add this code:
<!--FOLLOW-ME-STARTS--><a style="display:scroll;" href="http://twitter.com/rnhckr" class="feedbacktw"> </a><!--FOLLOW-ME-STOPS-->
Change the link in RED color to your own Twitter profile.

The two images used in this hack are designed by me. Presently I have made the images with only black and blue background colors. You may use both/any one in your blog. If you do not want to show a different image on mouse-hover then delete the .feedbacktw:hovercode in step 3, and add only this code:
<!--FOLLOW-ME-STARTS-->
<style type='text/css'>
.feedbacktw {
width: 31px;
height: 136px;
display: block;
font-size: 10px;
text-decoration: none;
background-repeat:no-repeat;
background-image:url(http://i26.tinypic.com/1zb4509.jpg);
position:fixed;
top:35%;
right:2px;
}
</style>
<!--FOLLOW-ME-STOPS-Widget-by-http://rnhckr.com-->

In case you want the same follow-me badge with some other background color (other than black and blue), then tell me the hex-HTML-color code through comments below...